Thursday, 25 June 2015
visual editing guide
When editing on final cut to create a animation, you need to be getting everything right from clips to transitions so the animation will look as professional as possible.
Clips
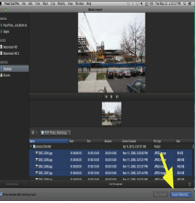
When starting an animation, you need to import all the clips you need. So, at the top of the window, click a tab saying 'file' where it should drop down and show options. There will be a option saying 'import' then that will also give you more options where one will say 'media'. This will take you to a small window where you can start browsing files for your clips to import them. Once you have selected all your footage, click the button saying 'import selected' and from here your footage will be ready to edit.
Laying on the timeline
When your footage is on the timeline, there are a few options on how you can edit. The first option is simple but can be long as you have to drag each clip to their correct position on the timeline and get them into the correct order. The second option is to go to the top of the window and select the tab 'edit' then 'select all' this then means that all the footage will be highlighted and drag all the selected clips and move them into the correct position.
Cutting
When trying to cut down your clips to the right length. Sometimes this can be a long process as you need to select modify at the top of the window and then select 'change duration'. This will help you later the size of the clips.
Transitions
With final cut, you can add transitions to the animation to make it look more professional. How to do this is by going to the top and selecting 'edit' then 'effects' and then 'video transitions'. There are plenty of options from fades to wipes to dissolves to shapes.
Adding sound effects and music
When choosing to add sound effects and music to your animation you do this the same way as you didi when importing the images. Once imported the selected sounds and music, all you need to do is drag it underneath the footage so it plays at the same time as the clip.
Exporting the document
When exporting your movie you need to go to "file" then down to "Export" then you want to export it as a quick time movie and then you can save it to your desktop so that it is easy to access.
Subscribe to:
Post Comments (Atom)


No comments:
Post a Comment