Thursday, 25 June 2015
visual editing guide
When editing on final cut to create a animation, you need to be getting everything right from clips to transitions so the animation will look as professional as possible.
Clips
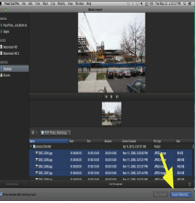
When starting an animation, you need to import all the clips you need. So, at the top of the window, click a tab saying 'file' where it should drop down and show options. There will be a option saying 'import' then that will also give you more options where one will say 'media'. This will take you to a small window where you can start browsing files for your clips to import them. Once you have selected all your footage, click the button saying 'import selected' and from here your footage will be ready to edit.
Laying on the timeline
When your footage is on the timeline, there are a few options on how you can edit. The first option is simple but can be long as you have to drag each clip to their correct position on the timeline and get them into the correct order. The second option is to go to the top of the window and select the tab 'edit' then 'select all' this then means that all the footage will be highlighted and drag all the selected clips and move them into the correct position.
Cutting
When trying to cut down your clips to the right length. Sometimes this can be a long process as you need to select modify at the top of the window and then select 'change duration'. This will help you later the size of the clips.
Transitions
With final cut, you can add transitions to the animation to make it look more professional. How to do this is by going to the top and selecting 'edit' then 'effects' and then 'video transitions'. There are plenty of options from fades to wipes to dissolves to shapes.
Adding sound effects and music
When choosing to add sound effects and music to your animation you do this the same way as you didi when importing the images. Once imported the selected sounds and music, all you need to do is drag it underneath the footage so it plays at the same time as the clip.
Exporting the document
When exporting your movie you need to go to "file" then down to "Export" then you want to export it as a quick time movie and then you can save it to your desktop so that it is easy to access.
team meeting minutes
During this meeting we discussed a number of different topics that needed to be completed during the following weeks ahead. Between us we divided the work into 3 different sections.
Harry : Filming, editing and creating the animation.
Olly : Story Ideas and planning.
harry and olly : Sounds effects and lighting.
Once we sorted out what everyone was doing, we started to work on making the animation relate to our charity children in need. We originally was going to use lego to create our animation but we then soon realised that we needed to take a more "serious" approach to the animation, so we all came up with the idea to use paper cut out animation. Baring this in mind we had to make sure we made the animation clear to understand what the charity does and what they stand for, we discussed a number of different ideas which all seemed good at the time but we soon finally settled down with one strong idea which we believe represents children in need in the best way possible.
After deciding on our idea, we then had our own jobs to do (as listed above). Each of our jobs were vital in the process of creating this animation as they all rely on each other in order to create a successful animation. This meeting lasted roughly 10-15 minutes.
Harry : Filming, editing and creating the animation.
Olly : Story Ideas and planning.
harry and olly : Sounds effects and lighting.
Once we sorted out what everyone was doing, we started to work on making the animation relate to our charity children in need. We originally was going to use lego to create our animation but we then soon realised that we needed to take a more "serious" approach to the animation, so we all came up with the idea to use paper cut out animation. Baring this in mind we had to make sure we made the animation clear to understand what the charity does and what they stand for, we discussed a number of different ideas which all seemed good at the time but we soon finally settled down with one strong idea which we believe represents children in need in the best way possible.
After deciding on our idea, we then had our own jobs to do (as listed above). Each of our jobs were vital in the process of creating this animation as they all rely on each other in order to create a successful animation. This meeting lasted roughly 10-15 minutes.
pitch feedback for animation
Pros:
We have shown development within our decision of our animation, we first was going to use lego however, we have shown that using lego show make our animation look like we wasn't taking it serious enough, so we have shown development of wanting to change our original idea to paper cut outs, as we felt it best suited the charity and would be the most effective way.
We have shown a clear understanding of the background of children in need, and have shown good research building up to the creation of our animation.
We was able to explain the purpose of children in need and give examples of what they do. Within our chosen idea we have given a clear understanding of what the charity does.
We have clear understanding of who our characters are and what they are doing within our animation. we have shown good detailed illustrations with some explanation of who they are and what role they were doing.
We have given a clear understanding of what Mise-en-scene is and how it is involved in our animation we have clearly described what effect we are using and the props lighting and costumes that will be used in our animation.
Cons:
The concept of our idea wasn't correct the first time we came up with ideas due to us not having a full understanding of Help for Heroes. We have improved this by researching Help for Heroes in more detail and then we have chosen to use a life story of a wounded soldier. This has helped us come up with more ideas that tell a better story and relate to Help for Heroes the best.
Within our storyboard we have given a good visual look however there isn't any writing to also explain in more detail about the camera angles and what is happening. we have used the same storyboards but underneath each drawing we have added in the camera angle and also what is occurring within the frame.
We didn't explain who the target audience was we was aiming for so and to improve we would need to show a full understanding of who the target audience is and who we are aiming it towards.
For our set designs it wasn't clear exactly what we was doing. we had explained our different sets we was going to use but wasn't explained in enough detail. To improve this we have now drawn out the set designs we are using and then underneath we have explained in detail why we are using them and in what part of the animation they will appear.
We have shown development within our decision of our animation, we first was going to use lego however, we have shown that using lego show make our animation look like we wasn't taking it serious enough, so we have shown development of wanting to change our original idea to paper cut outs, as we felt it best suited the charity and would be the most effective way.
We have shown a clear understanding of the background of children in need, and have shown good research building up to the creation of our animation.
We was able to explain the purpose of children in need and give examples of what they do. Within our chosen idea we have given a clear understanding of what the charity does.
We have clear understanding of who our characters are and what they are doing within our animation. we have shown good detailed illustrations with some explanation of who they are and what role they were doing.
We have given a clear understanding of what Mise-en-scene is and how it is involved in our animation we have clearly described what effect we are using and the props lighting and costumes that will be used in our animation.
Cons:
The concept of our idea wasn't correct the first time we came up with ideas due to us not having a full understanding of Help for Heroes. We have improved this by researching Help for Heroes in more detail and then we have chosen to use a life story of a wounded soldier. This has helped us come up with more ideas that tell a better story and relate to Help for Heroes the best.
Within our storyboard we have given a good visual look however there isn't any writing to also explain in more detail about the camera angles and what is happening. we have used the same storyboards but underneath each drawing we have added in the camera angle and also what is occurring within the frame.
We didn't explain who the target audience was we was aiming for so and to improve we would need to show a full understanding of who the target audience is and who we are aiming it towards.
For our set designs it wasn't clear exactly what we was doing. we had explained our different sets we was going to use but wasn't explained in enough detail. To improve this we have now drawn out the set designs we are using and then underneath we have explained in detail why we are using them and in what part of the animation they will appear.
crew roles for animation
Director: Harry Holland
Definition: he/she is the organizer and developer of the animation that they are trying to produce: I would organize and arrange the scenes and how I would like them to go
Producer: Oliver Friend
Definition: The Producer is frequently the first person to become involved in a project; they participate directly in all the main producing. Also they make the budget. :I Booked the cameras and organized the budget and also I made the changes that needed to be improved
Director of Photography (D.P.): Harry Holland
Definition: they are the heads of department on filming productions and have a leading role of approving thing: he is in charge of the filming and positing of the camera and redoing the scenes if needed
Editor: Oliver Friend
Definition: an Editor is someone who work’s closely with the Director, after the filming is completed, his is to assemble sots to piece together to make the final film. : I am in charge of the editing and making the advert all on final cut.
Camera Operator: Harry Holland
Definition: The Camera Operator sets-up positions and operates the camera. The right angels the film the right shots for the scenes. : He is in change of the cameras positions and also is in charge of the angles.
Minor Roles
Assistant Camera (A.C.): Harry Holland
Definition: assist the camera mad holding him when walking back so he doesn’t trip up and also helps him set up. : He is inchage of helping the camera man and helping him but giving advice.
Assistant Director (A.D.): Oliver Friend
Definition: he is his help man taking responsibility for number of important jobs due to the camera. He also needs to take care of the camera man when using the camera.
Art Director: Harry Holland
Definition: create all the set art work and makes the shots and sets look as good as they should do. : he is in charge of making the shot look good and making the space around the shot even
Casting Director: Oliver friend
Definition: organizes the cast to produce them to be organizes and be ready for them to film the next shot. I am in charge on telling then what is going to happen next and were they should be.
Location Scout: Sir
Definition: you travel around the world to find all types or locations for your film to be filmed at: sir is inchagre on were we go and how to get there but he takes ideas form us on were to go.
Production Manager (P.M.): Harry Holland
Definition: they produce all of the mangers television like. Light children’s programs and is responsible for all the organizational aspects of production including a budget: I am charge on what’s happening and also the budget
Screenwriter:Oliver Friend
Definition: screenwriter are responsible fro reaching certain ideas for the story. Writhing screenplays and delivering the. : I take the responsibilities on the ideas and creativity for the adverts.
target audience research
The primary target audience for our animation for Children in need will be to children and parents of children who have/had disabilities. Through research we have come to a decision that our age range will be between 5 - 40 year olds as this age range is the most popular type that donate money to the charity. This target audience are thought to be the most passionate about the charity and raising money to support and fund projects for the children.
The secondary target audience will be who is most likely to be with the primary target audience when viewing the animation online or television. Through more discussion we came to the decision that it will be the age range of 5 - 40 year olds. This age range is currently the most popular range of age on the internet and watching television. The advert would be broadcasted in-between programmes or shown on social media sites where people will be able to view the animation and share across the internet to their contacts/friends.
Subscribe to:
Posts (Atom)


